How To Corner On A MTB
If you are a MTB Rider looking to maximise speed and pace on trails, whether that’s during competitive racing or simply wanting to improve your recreational riding skills - you are not alone. One of the biggest barriers to building up speed on MTB Trails is cornering. Most MTB riders want to enjoy free flowing trails - enjoying maximum speed and efficiency - whether that’s to shave seconds off a personal best time, or simply keep up with mates on the trails. That’s why in this post, we look at some of the basic techniques to improve your MTB cornering performance.
First of all, it’s important to note that learning correct cornering technique is not only about increasing speed - it’s also about learning how to negotiate and travel across all of the types of corners that you find on a trail. Maximising grip and traction will not only improve your timings, but will also improve your ability to ride more challenging terrain. In many ways, advances in mountain bike technology means that cornering is easier than ever, but much in the same way that mountain bike technology has improved, the industry has responded with gnarlier trails, with more demanding corners than ever - meaning a rider still has to perform.
Cornering MTB Technique
Unfortunately cornering on a MTB does bring together all of the cycling language that we use to explain technique, so expect plenty of buzzwords! Cornering involves both physical and mental mountain bike skills - it combines body position, footwork, as well as speed control and planning. As mentioned above, mountain bikes today are more forgiving than they have ever been, so these skills are for those looking to perfect cornering.
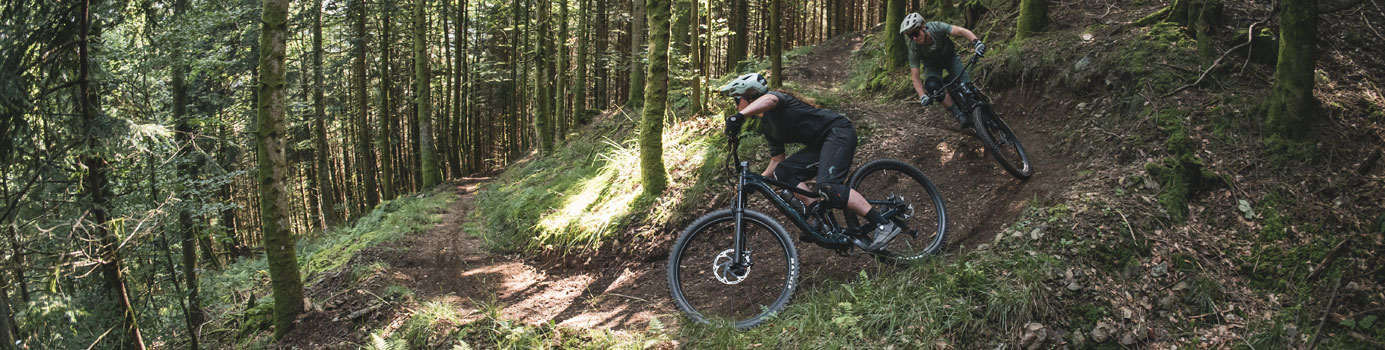
Corner Entry
On the lead up to a corner, the rider needs to be looking ahead to view their line. Ideally this will be done when riding on the outside edge of the trail, which allows the rider to look through the corner. Sometimes, it’s not that easy to look through the corner - with obstacles on the trail in the way, such as trees, rocks and stumps.
During this time, it’s important to scrub speed off when required - it’s better to scrub some speed off when the bike is upright and in a straight position. Those who want to slide through the corner won’t do this though, they will use the front brake to lighten the rear wheel and then apply the rear brake when entering the corner to drift the bike through the corner.
Those who are skidding round the corner will also look to use the ground to find greater momentum. A scandinavian flick, which is used in the world of rallying is handy here - and the rider can form an S motion before the corner to gain extra movement to help drift the back of the bike round the corner.
MTB Cornering Body Position
Body position is at the core of everything a rider does on a mountain bike, unlocking the correct body position for different riding scenarios, makes everything so much easier. Finding the right body position is not always easy, but with plenty of practice - you can find what works best for you. Cornering position should be tall, with dropped heels. Your elbows should be wide and your head will ideally be over the stem.
Pushing elbows out wide, as well as lowering the back (through the hips) means that there is greater weight over the front of the bike, which aids grip to maximise front wheel grip on the entry to the corner. This body position is more advantageous on bikes which have a slacker head angle.
It’s also important to face down the trail, where you want to ride. Think of the outer boundaries of the trail as painted with white lines, keeping the bike in the middle of these lines, then becomes essential. When looking down the trail, try to use your body to turn the bike. Avoid twisting the body, but instead follow the direction of the wheel with your body position. Think about getting the tyre on the edge, much in the same way that motorbike racers do.
Most shallow turns are ridden with cranks level, but on steeper and more aggressive/tighter corners - the rider may need to drop the outside foot for added lean and traction.
Riding Berms
Berms will typically have consistent camber, so you can expect the predictability and consistency of the corner. When riding berms the rider should keep pedals level and choose a line which keeps you on the same line as you ride around the berm. Ensure that your arms & legs are bent during the entry stage of the corner, pick a consistent line and stand up on the bike when entering the berm, placing weight into the camber of the corner. Keep momentum around the camber by pumping through the berm.
Riding Corners Faster
There are a couple of key things to consider when looking to carry more speed out of corners - the first is to look where you want to go, past the corner and further down the trail. In doing so, you can expect to be riding where you are looking, Vs zoning in and just concentrating on negotiating the corner. The next area of importance is to remember to drive weight into the bike, lean it into the corner and have confidence that the tyres will grip and see you successfully pass through the corner.
Riding Flat Corners
Although flat turns may sound easier to ride, the less camber that a corner has - the less grip there is around the corner, so the less momentum the rider can expect. There are a few things which can be done at the entrance to the corner in order to negate this. On the way into the turn, the rider should throw their body position behind the direction of travel - follow the direction of the bike with your shoulders and body - which will drive momentum and pace through the corner.
Riding Switchbacks
Switchbacks are not often found at mountain bike trail centres, but those who ride backcountry will be familiar with them. The first thing to do when approaching a switchback is to scrub off speed - switchbacks are tight corners, so speed does need to be reduced. Reduce speed by braking before the corner, and build up speed gradually by practicing switchbacks.
Choose your line approaching the switchback, if it’s a left turning switchback - position the bike to the right, and take the widest possible line. Always look at where you want to ride, with the premise of looking where you want to go, and the bike and body following.
Position wise, drop your outside foot and ensure that your shoulders and hips follow the direction of the trail.
Slow Entry And Fast Exit
All of the above centres around taking your time on the way into the corner, sorting out the body position, where you are looking and searching for the best line. Remember the adage of ‘smooth is fast’ and also remember that practice makes perfect!